Integration and Regression Testing Environment
Since its beginning, the strongSwan project has been using a virtualized integration and regression testing environment to ensure the quality of each release. The test results of the latest release are always published online.
The test environment is based on KVM and reproducible guest images based on Debian. In earlier releases it was based on User-Mode-Linux (UML) and a Gentoo base image.
| Hardware virtualization support is required (Intel VT/AMD-V). So running the testing environment in a VM itself generally doesn’t work. However, it might with newer hypervisors that support nested virtualization. |
Building the Testing Environment
Supported Architectures
The host system currently has to run the same architecture as the guests, whose
architecture can be changed via BASEIMGARCH in
testing/testing.conf or in
testing/testing.conf.local that is not managed by Git. The only fully supported
architecture currently is amd64.
Required Packages
On Debian/Ubuntu, the following packages are required to build the testing environment:
* debootstrap
* e2fsprogs
* kvm
* libvirt-bin
* parted
* qemu
* wget
* gcc
* make
Configuration and Build
All the required scripts, config files and test suites are located in the
testing directory of the Git repository or a release tarball.
Before starting the build, you may want to modify some of the variables in the
testing.conf file, or in testing.conf.local, which is not managed by Git.
For instance, the TESTDIR variable defines the root directory in which the
whole testing environment will be built. And by setting any of the ENABLE_BUILD_*
variables to no, you can avoid rebuilding parts of the environment that have
already been built earlier. Although, the latter can also be achieved by manually
running the respective build scripts (see below).
Building is started by executing the make-testing script:
testing/make-testing
By default, this calls the following scripts:
-
testing/scripts/build-guestkernel: Builds a Linux kernel for use by the KVM guest hosts. The version etc. can be changed in the config file. It’s also possible to use an already built kernel from an arbitrary source tree by creating$BUILDDIR/linux-<name>as a symlink and configuringKERNELVERSION=<name>(compatible kernel configs can be found intesting/config/kernel). -
testing/scripts/build-baseimage: Creates a Debian-based "base" image on which all other images are based. This changes quite rarely. -
testing/scripts/build-rootimage: Creates a "root" image on top of the base image, in which several applications/libraries are built and installed from sources (testing/scripts/recipes). This includes strongSwan, which is why the script nowadays simply calls thebuild-strongswanscript with specific arguments (see below). -
testing/scripts/build-certs: Generates certificates and keys for the test scenarios. This uses the tools installed in the root image in a chroot. It automatically calls the next script to [re]build the guest images. -
testing/scripts/build-guestimages: Creates guest images for the KVM hosts based on the root image and the generated credentials.
As mentioned, for more control, these scripts can all be called manually to [re]build specific parts of the testing environment.
To rebuild and install strongSwan from the current or an arbitrary source tree
within the root image, the
testing/scripts/build-strongswan
script may be used. It automatically calls the build-certs and
build-guestimages scripts if necessary. Various optional arguments control
what’s actually built (it’s e.g. possible to completely rebuild the root image,
or only install strongSwan in the guest image of a particular guest, see
--help for details).
The
testing/scripts/chroot base|root|<guest>
command allows to modify a particular image in a chroot environment. Images
depending on a modified image have to be rebuilt afterwards. For the
root and guest images, the sources of the installed software are mounted
at /root/shared (that’s also the case when the hosts are running).
Platform-Specific Notes
On systems with AppArmor installed, libvirt uses the latter to secure
virtual machines. When creating a guest, libvirt automatically creates
AppArmor profiles. The problem is that older versions (< 7.1.0) didn’t create
profiles that reflect the multi-layered disk images we use (each guest’s image
is linked to the common root image which in turn is linked to the common base image).
One option to fix this is for affected versions of libvirt is to set
security_driver = "none" in /etc/libvirt/qemu.conf and execute
sudo service libvirt-bin restart
Using the Testing Environment
Starting the Environment
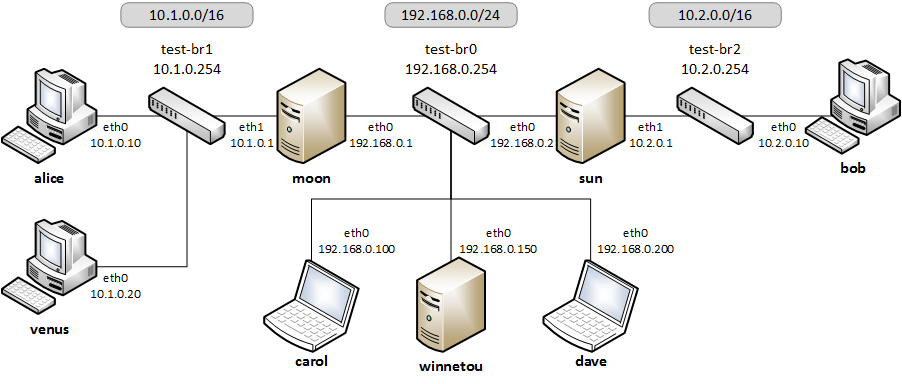
When the strongSwan testing environment has been put into place by running the build scripts, you are ready to start up the KVM instances by calling
testing/start-testing
The virtual topology looks like this:
Running the Automated Tests
The script
testing/do-tests <testnames>
runs the automated tests. If the <testnames> argument is omitted, all tests are
executed. Otherwise, only the tests listed will be run as shown in the following
example:
./do-tests ikev2/net2net-psk ikev2/net2net-cert
Wildcards are also supported:
testing/do-tests ikev2/net2net-*
See --help for some advanced options.
Each test scenario is divided into the following phases:
-
Load the test-specific guest configuration if any is provided.
-
The
pretest.datscript found in each test directory is executed. Among other commands, strongSwan is started on the IPsec hosts. -
The
evaltest.datscript evaluates if the test has been successful. -
The
posttest.datscript terminates the test e.g. by stopping strongSwan on the IPsec hosts. It is also responsible to clean things up (e.g. firewall rules) that were set up inpretest.dat. -
Restore the default configuration on every host (new files have to be deleted manually in
posttest.dat).
The test results and configuration files for all tests are stored in a folder
labeled with the current date and time in the directory specified by the
TESTRESULTSDIR variable in testing.conf.
The same results are also automatically available via the Apache server running on guest winnetou and can be accessed via the URL
http://192.168.0.150/testresults/
Manual Testing
Instead of running tests automatically with do-tests it is possible to preload
a test scenario with the script:
testing/scripts/load-testconfig <testname>
Individual configuration files can be changed and any command can be executed by
logging on to a guest host directly. Either via SSH using the testing/ssh
script, or via serial console using e.g. virsh console --devname console1 or
the Virtual Machine Manager (VMM). No password is required to login as root.
After you finished testing, the default configuration can be restored with the following command (newly created files have to be deleted manually):
testing/scripts/restore-defaults