strongTNC
strongTNC is a Trusted Network Connect (TNC) Policy Manager which allows to define TNC measurement and enforcement policies and visualize the TNC measurement results of the registered endpoints. It is also possible to store Golden Values in the form of SHA2 reference hashes of any single file or all files contained in a Linux software package.
Installation
For the following installation and configuration steps we assume an Ubuntu Linux platform but the procedure on other Linux distributions is quite similar.
Install Apache Web Server
An Apache web server equipped with a Web Server Gateway Interface (WSGI) module is installed on Ubuntu by the command
sudo apt install apache2 libapache2-mod-wsgi
Install Python/Django
If not present yet, install the following Ubuntu packages
sudo apt install python3 python3-pip python3-dev libxml2-dev libxslt1-dev
Install strongTNC
The strongTNC project is hosted on GitHub. The latest release can be installed as follows
wget https://github.com/strongswan/strongTNC/archive/master.zip
unzip master.zip
sudo mv strongTNC-master /var/www/tnc
sudo chgrp -R www-data /var/www/tnc
sudo chmod g+sw /var/www/tnc
In the /var/www/tnc directory execute the command
sudo pip3 install -r requirements.txt
which updates the Django version if necessary and installs various Python modules required by strongTNC.
Configuration
Configure strongTNC
Copy config/settings.sample.ini to /etc/strongTNC/settings.ini and adapt
the settings to your preferences.
[debug]
DEBUG=0
TEMPLATE_DEBUG=0
DEBUG_TOOLBAR=0

[db]
DJANGO_DB_URL=sqlite:////var/www/tnc/django.db
STRONGTNC_DB_URL = sqlite:////etc/pts/config.db

[localization]
LANGUAGE_CODE=en-us
TIME_ZONE=Europe/Zurich

[admins]
Your Name: jane.doe@example.com
Another Admin: joe.doe@example.com

[security]
SECRET_KEY=strongSwan
ALLOWED_HOST=127.0.0.1,tnc.example.com,tnc
The /var/www/tnc/django.db database where the login passwords are stored, is
created with with the following command
sudo python /var/www/tnc/manage.py migrate --database meta
Next set the strongTNC admin-user and readonly-user access passwords to
strongSwan in our example
sudo python /var/www/tnc/manage.py setpassword
--> Please enter a new password for admin-user: <admin-user password>
strongSwan
--> Granting write_access permission.
Looking for readonly-user in database...
--> Please enter a new password for readonly-user: <readonly-user password>
strongSwan
Passwords updated succesfully!
In a production environment, instead of strongSwan use a strong SECRET_KEY
and strong admin-user and readonly-user passwords to protect the
confidentiality and data integrity of your TNC database.
In order to get a correct display of the strongTNC web pages you have to execute the following command
sudo python /var/www/tnc/manage.py collectstatic
Configure strongTNC Virtual Web Server
In the /etc/apache2/sites-available directory create the following configuration file and name it e.g. tnc.conf`
WSGIPythonPath /var/www/tnc

<VirtualHost *:80>
    ServerName tnc.example.com
    ServerAlias tnc
    ServerAdmin jane.doe@example.com

    DocumentRoot /var/www/tnc

    <Directory /var/www/tnc/config>
        <Files wsgi.py>
            Order deny,allow
            Allow from all
        </Files>
    </Directory>

    WSGIScriptAlias / /var/www/tnc/config/wsgi.py
    WSGIPassAuthorization On
    WSGIApplicationGroup %{GLOBAL}

    ErrorLog ${APACHE_LOG_DIR}/tnc/error.log
    LogLevel warn
    CustomLog ${APACHE_LOG_DIR}/tnc/access.log combined
</VirtualHost>
It is strongly recommended to use Let’s Encrypt or some other CA
to access the strongTNC website via https.
Initialize PTS Database
I you haven’t done so yet during the strongSwan
TNC server installation,
initialize the PTS SQLite database and set group www-data write permission
both on the database and the /etc/pts directory, so that SQLite can create
temporary files in it
sudo mkdir /etc/pts
cd /usr/share/strongswan/templates/database/imv/
sudo cat tables.sql data.sql | sqlite3 /etc/pts/config.db
sudo chgrp www-data /etc/pts /etc/pts/config.db
sudo chmod g+w /etc/pts /etc/pts/config.db
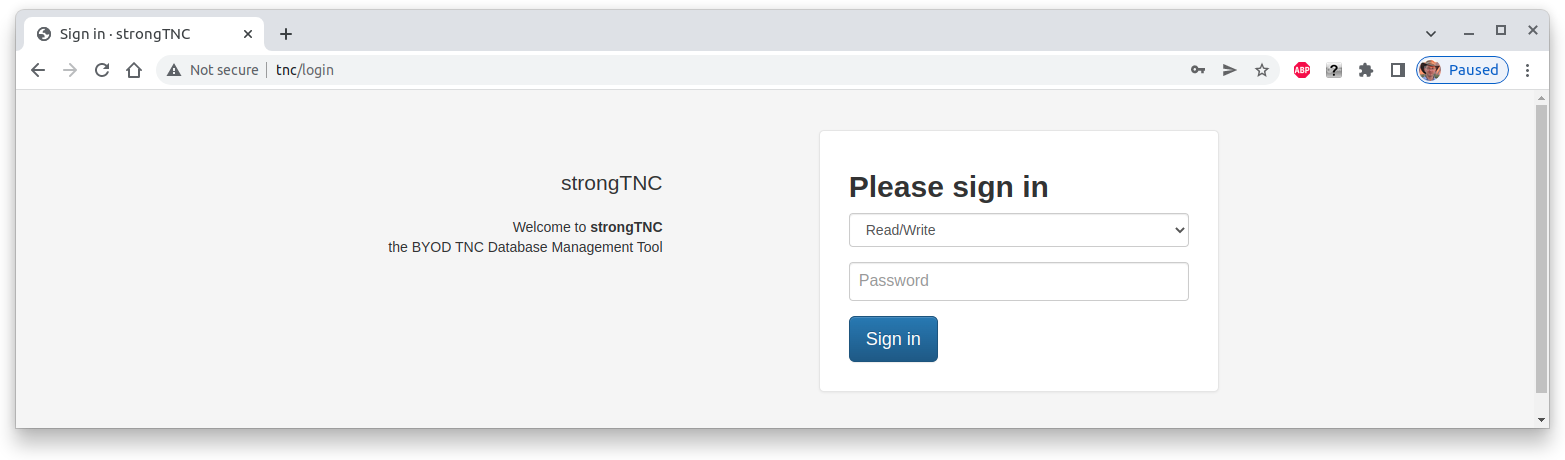
Login
Open the tnc website in a browser. Select Read/Write access and log in by
entering the admin-user access password which is strongSwan in our example.
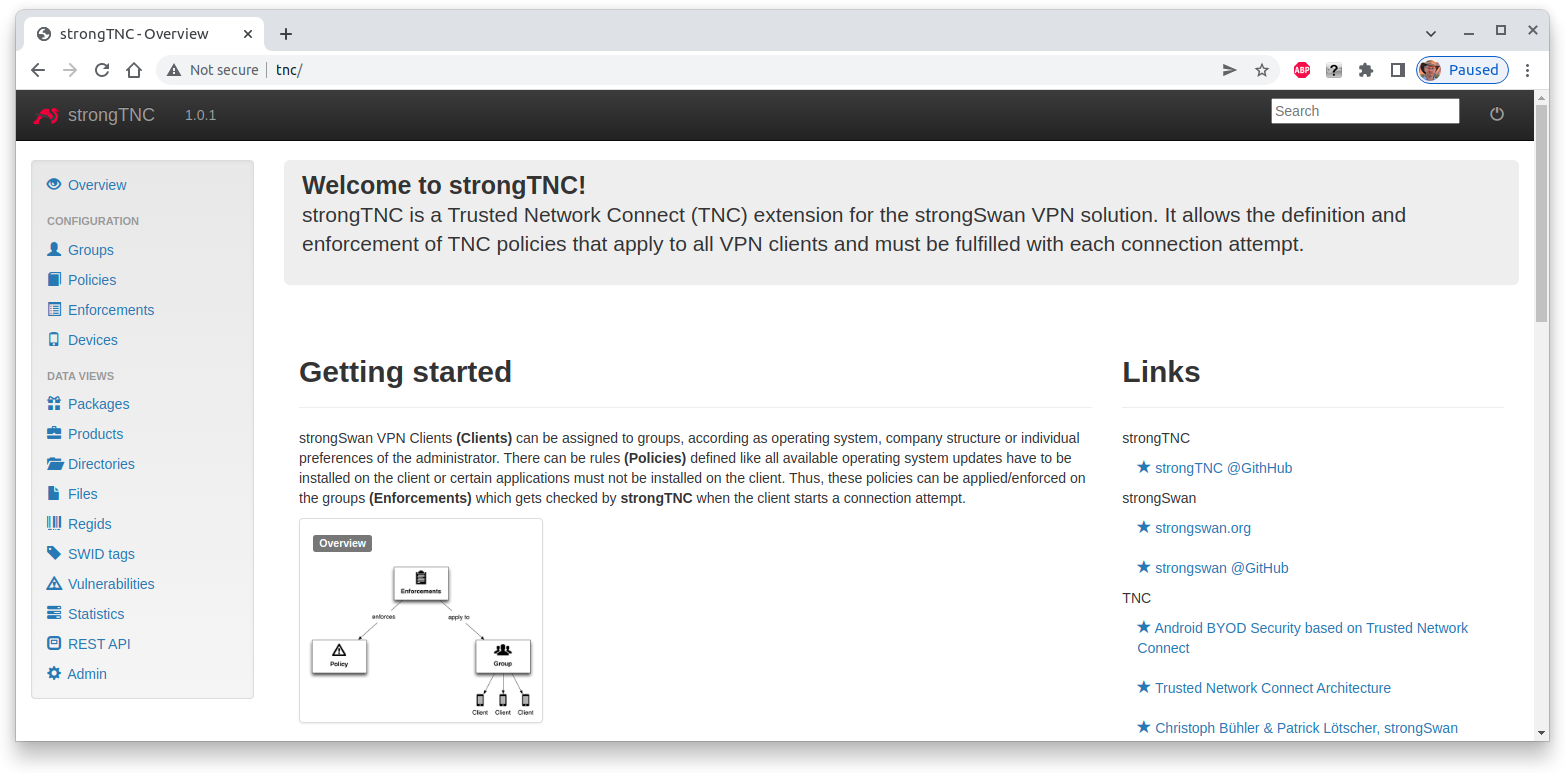
If the login has been successful, the overview screen with menu of all available functions appears
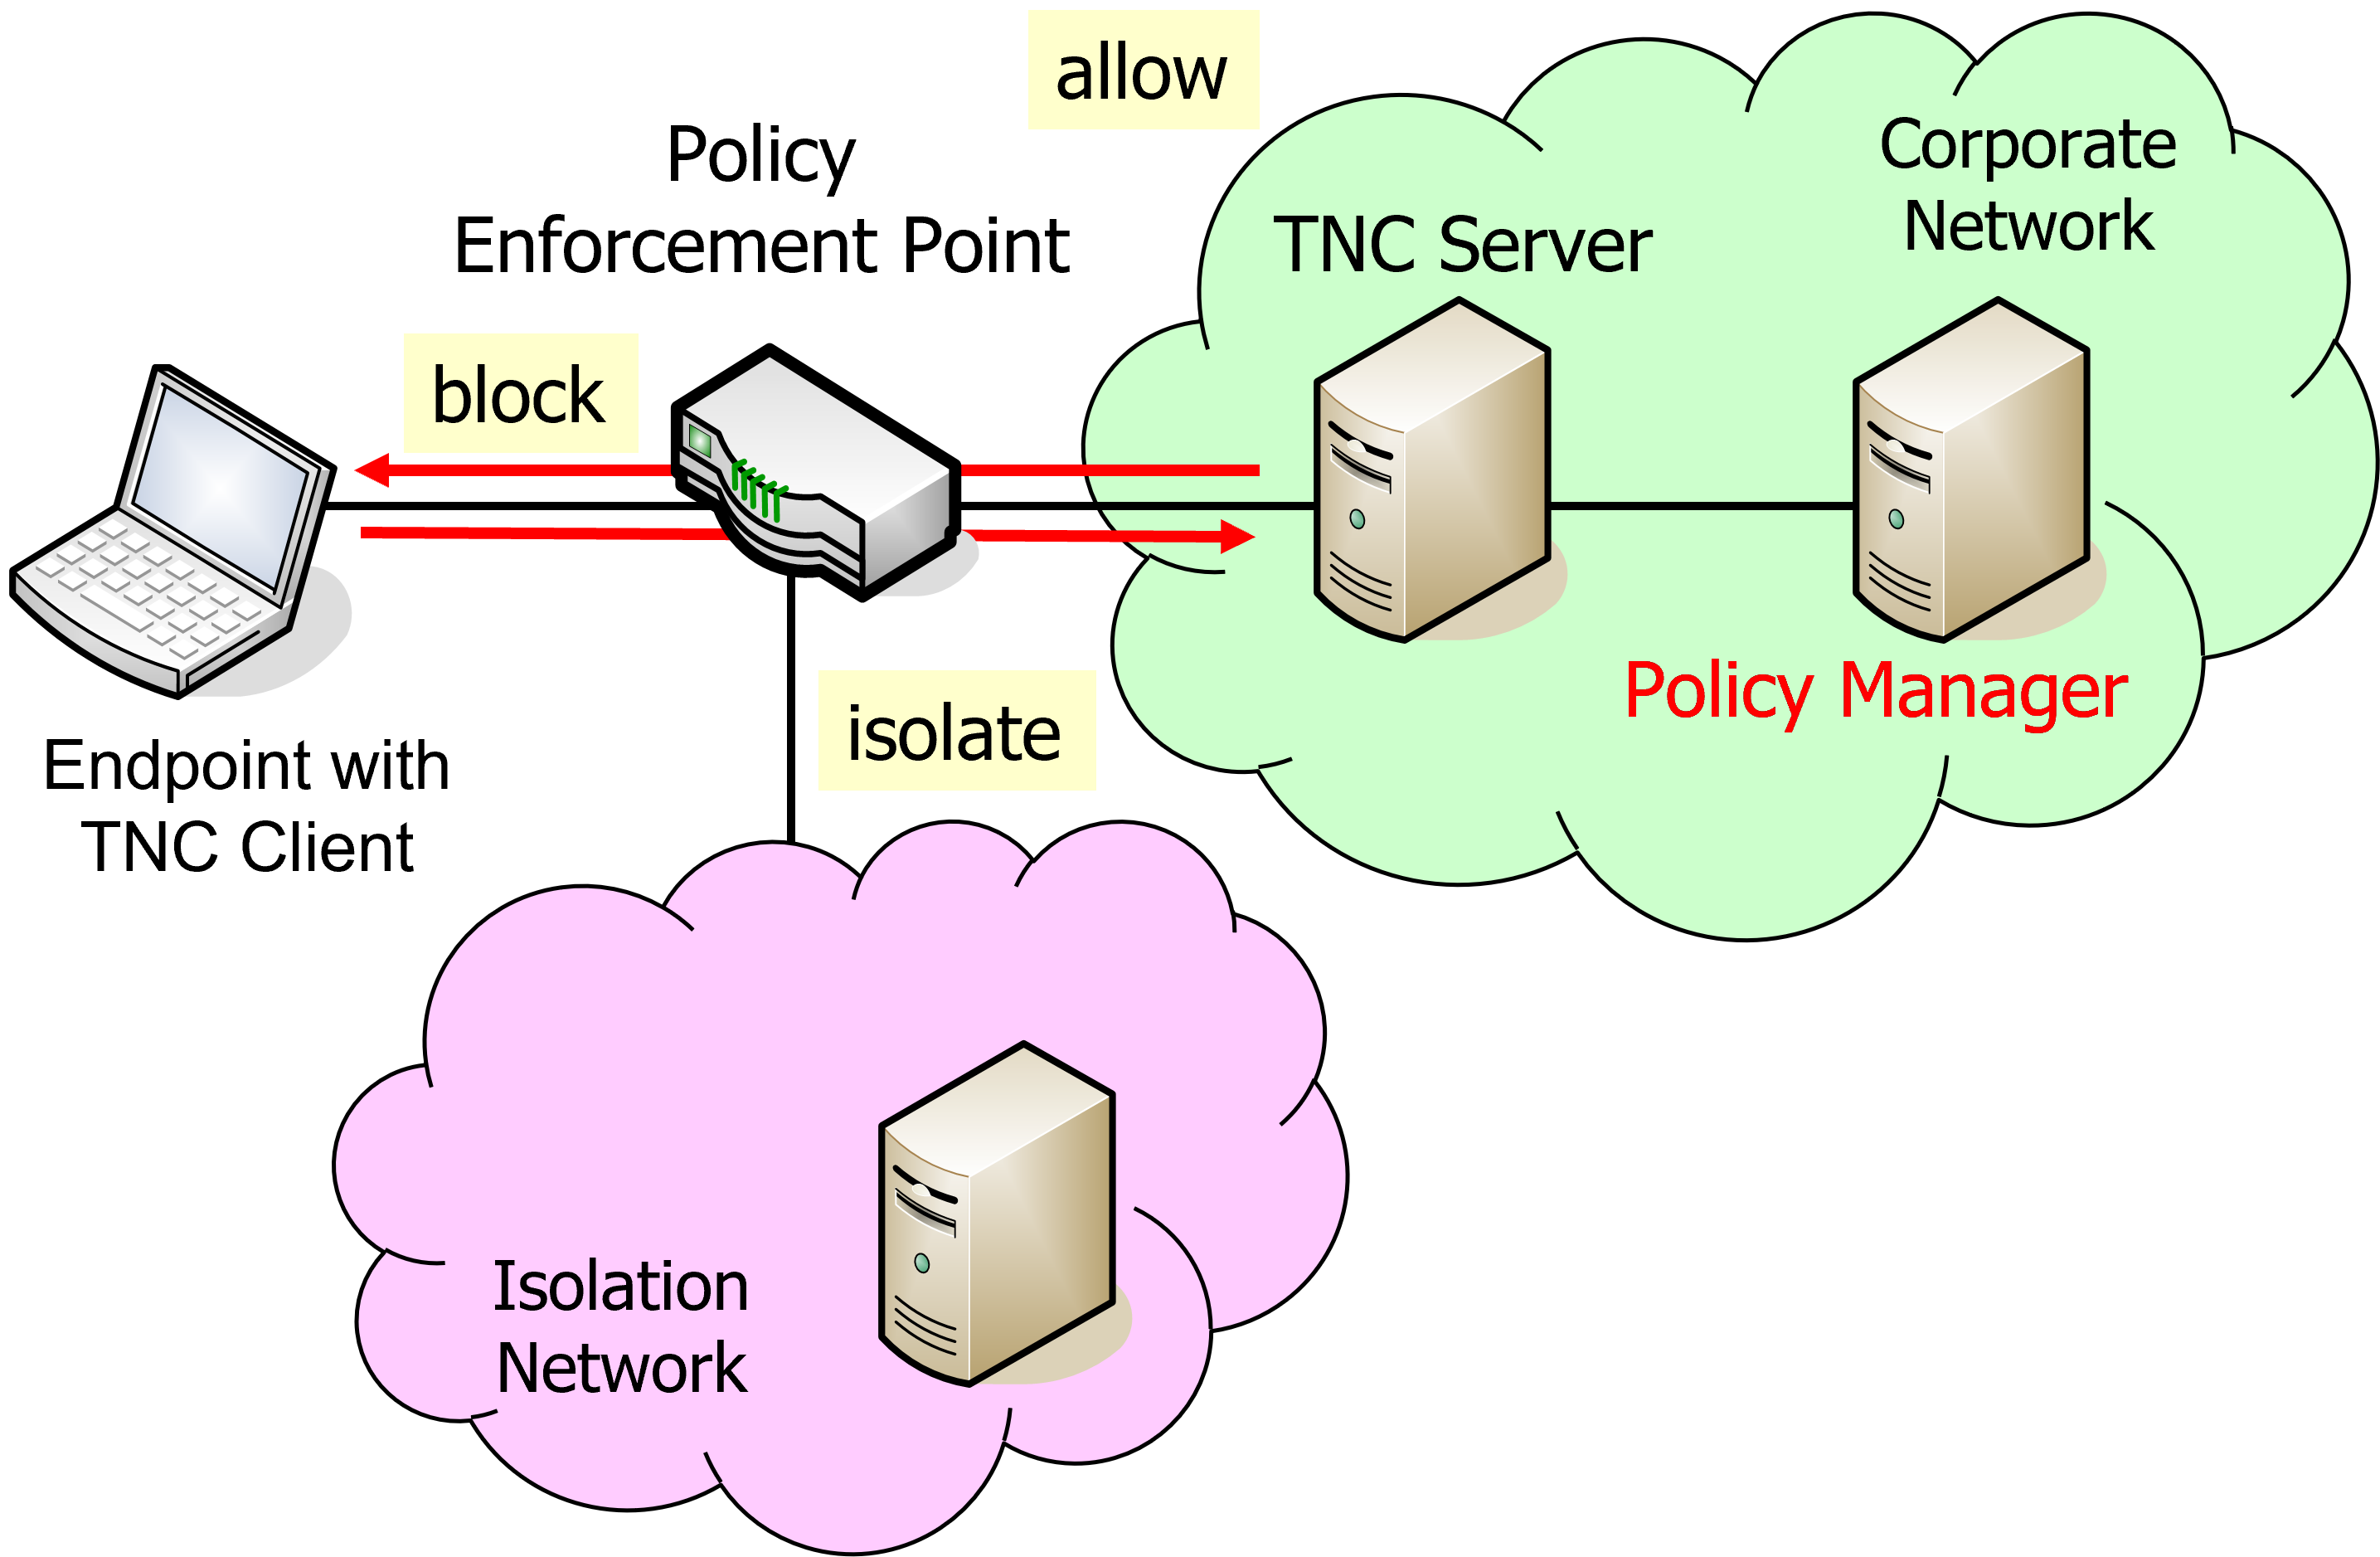
TNC Measurement 1
Let’s have a look at the TNC-enabled certificate-based IKEv2
VPN connection
setup where an OS IMC and a Scanner IMC are collecting measurements on
the TNC client and are sending the results to the OS IMV and Scanner IMV
on the TNC server, respectively.
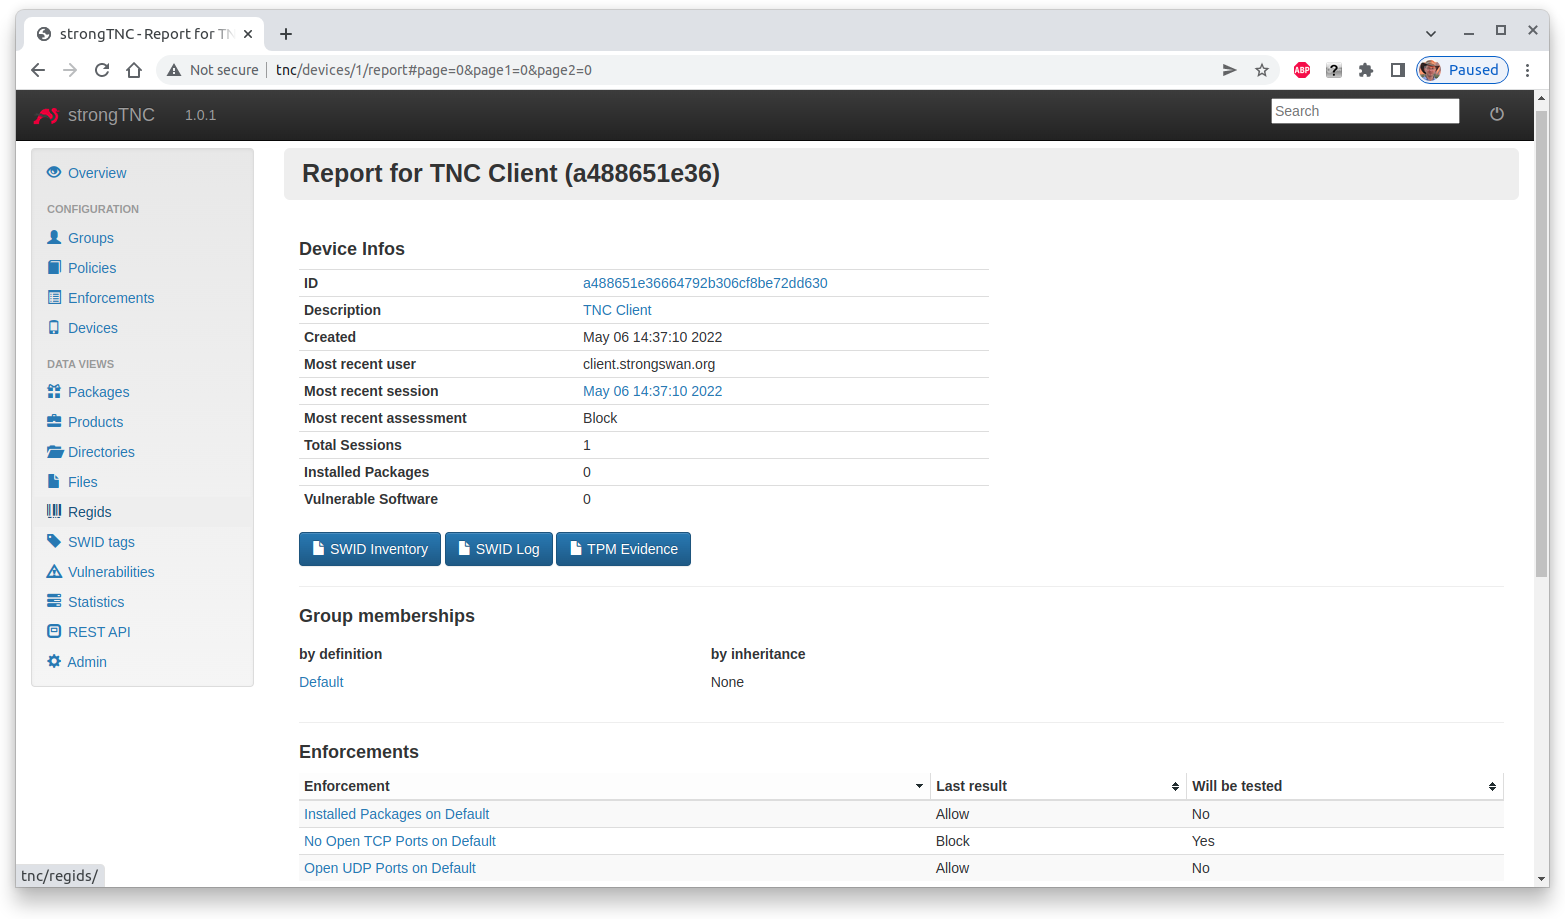
After the connection attempt has taken place, the strongTNC Devices view shows
a new endpoint identified by its Device ID with the unique value
a488651e36664792b306cf8be72dd630, abreviated to a488651e36
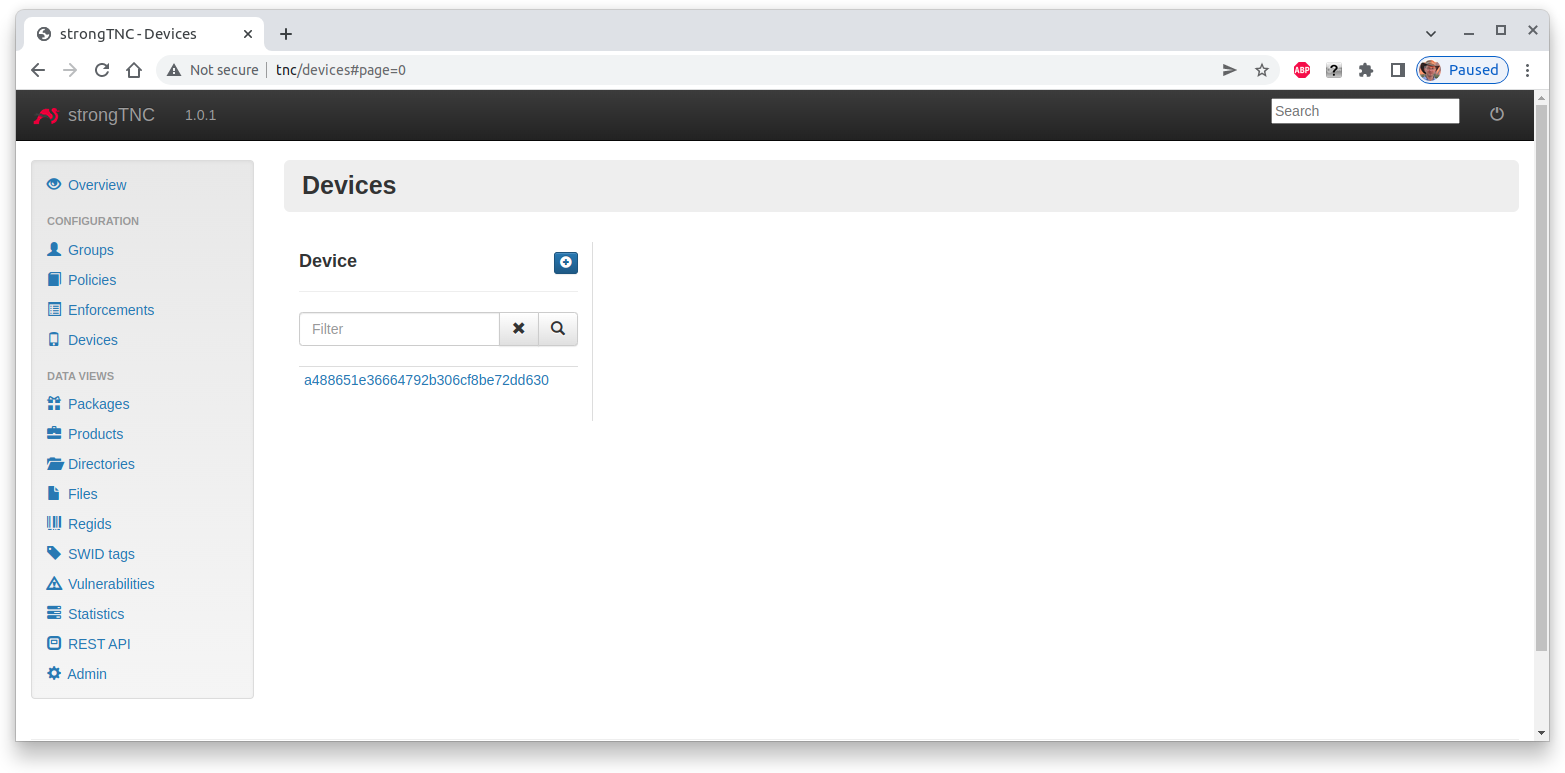
Clicking on this ID opens a view where a Description (e.g. TNC Client) can be entered and stored by pressing Save.

Due to the open TCP port 38953 on the TNC client, the Scanner IMV on the
TNC server declares no access
09[IMV] list of tcp ports that are allowed to be open:
09[IMV] tcp port 38953 open: fatal
09[IMV] IMV 2 handled TCPOP workitem 2: no access - violating tcp ports: 38953
        ...
09[TNC] IMV 2 provides recommendation 'no access' and evaluation 'non-compliant minor'
Finally the TNC Server issues the overall recommendation no access which aborts
the IKEv2 connection setup
13[TNC] final recommendation is 'no access' and evaluation is 'non-compliant minor'
13[TNC] policy enforced on peer '192.168.0.3' is 'no access'
13[IKE] EAP_PT_EAP method failed
13[TLS] sending TLS close notify
This shows up in the Device report where the most recent assessment is Block.
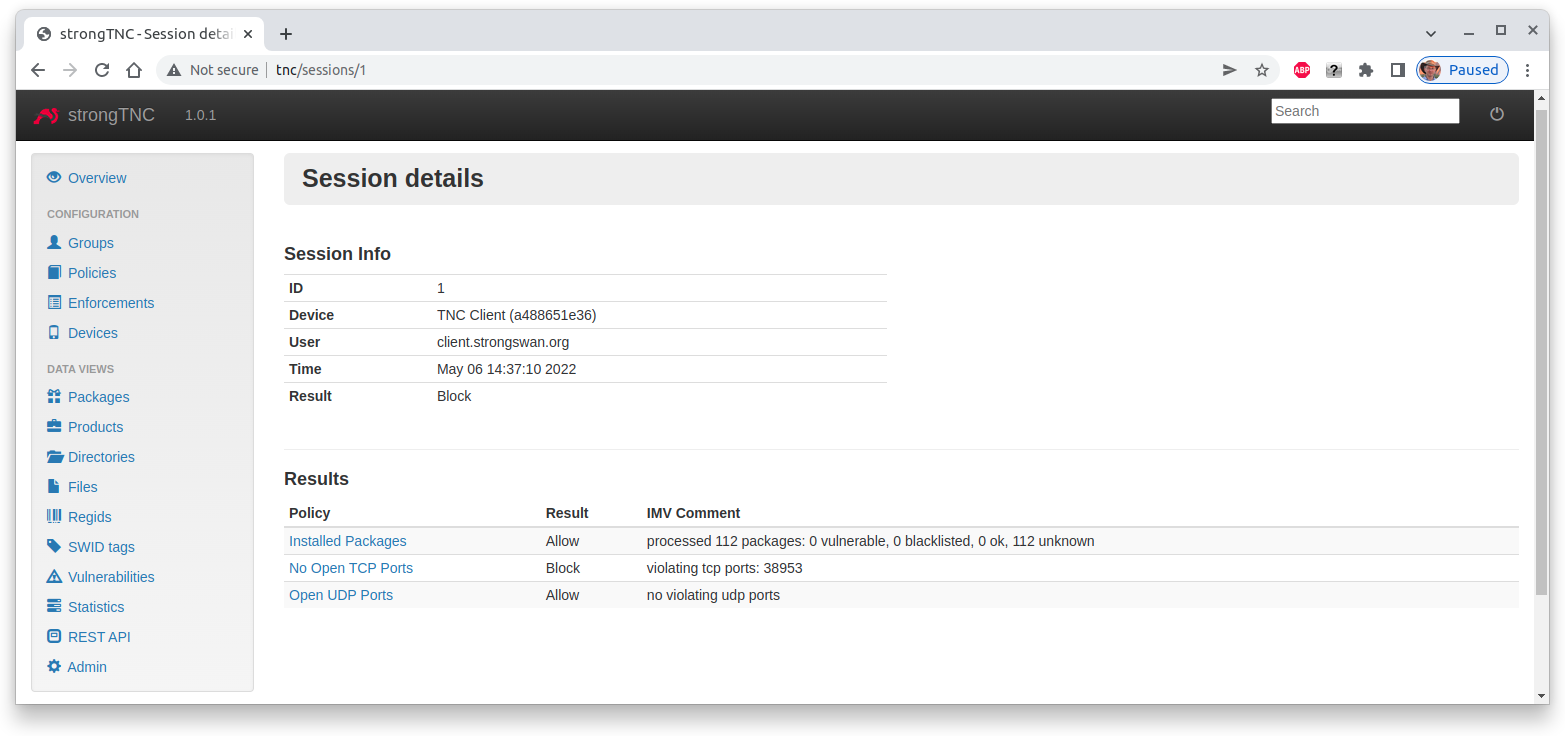
Clicking on the most recent session shows the Session details, e.g. that the
open TCP port 38953 caused the Block result
Change TNC Policy
Through the Policies function in the main menu, TNC policies can be added,
edited or deleted. Select the No Open TCP Ports policy and add the violating
port 38359 to the All ports closed except entry field and then press
Save

TNC Measurement 2
When the VPN connection is started again, the TNC measurements now comply with the
TNC policies and both the Scanner IMV
08[IMV] list of tcp ports that are allowed to be open:
08[IMV] 38953 - 38953
08[IMV] tcp port 38953 open: ok
08[IMV] IMV 2 handled TCPOP workitem 4: allow - no violating tcp ports
        ...
08[TNC] IMV 2 provides recommendation 'allow' and evaluation 'compliant'
and subsequently the TNC server issue an allow recommendation
09[TNC] final recommendation is 'allow' and evaluation is 'compliant'
09[TNC] policy enforced on peer '192.168.0.3' is 'allow'
09[TNC] policy enforcement point added group membership 'allow'
09[IKE] EAP_TTLS phase2 authentication of 'client.strongswan.org' with EAP_PT_EAP successful
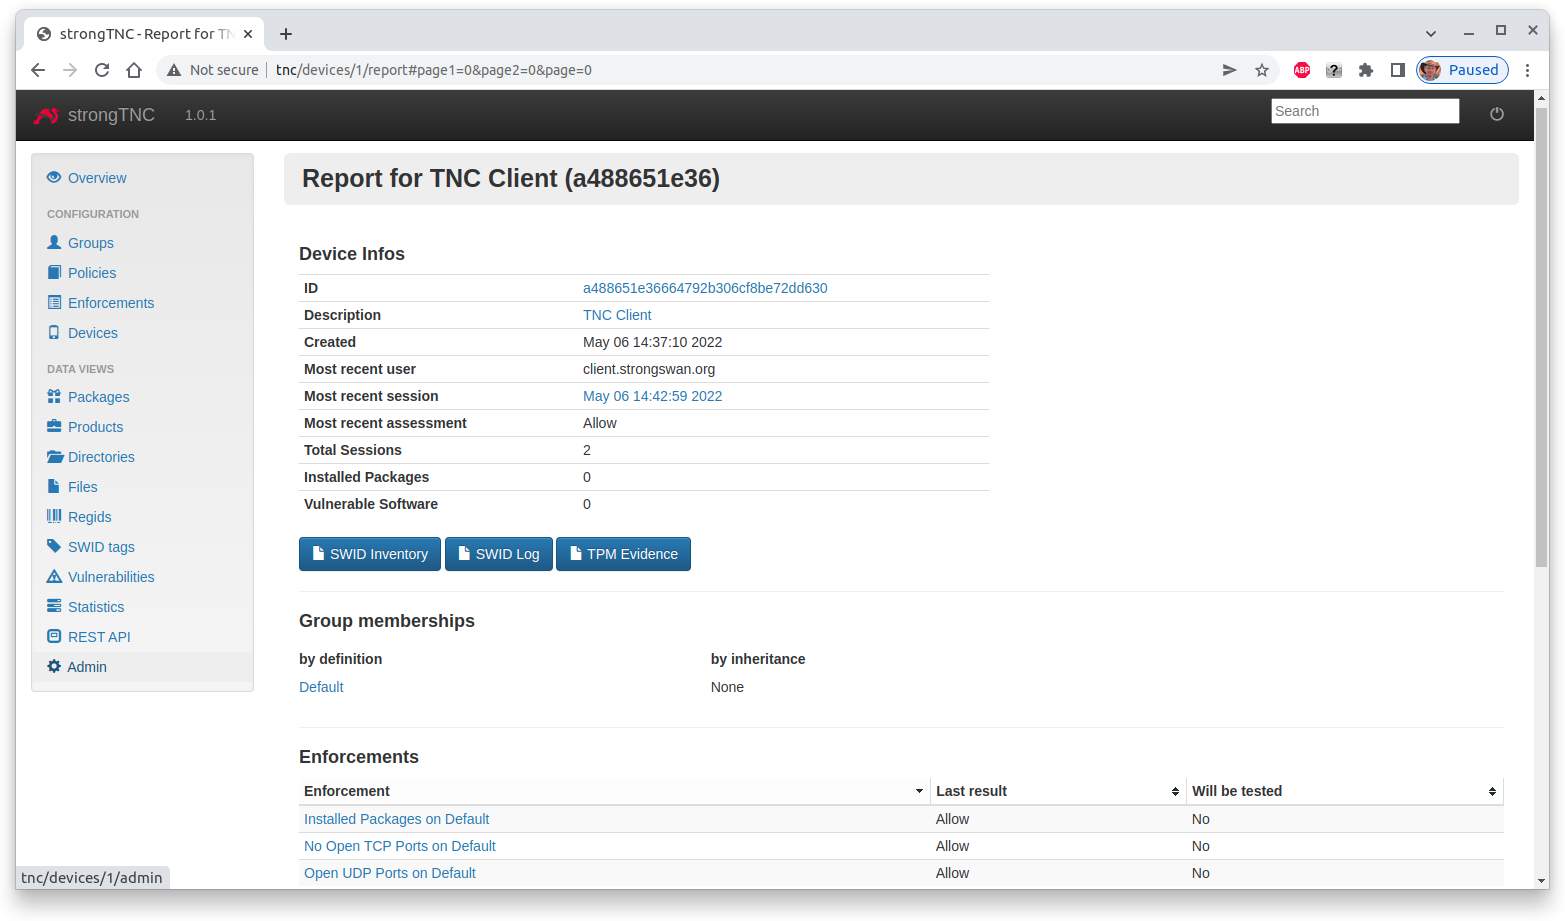
The Device report now displays an Allow assessment
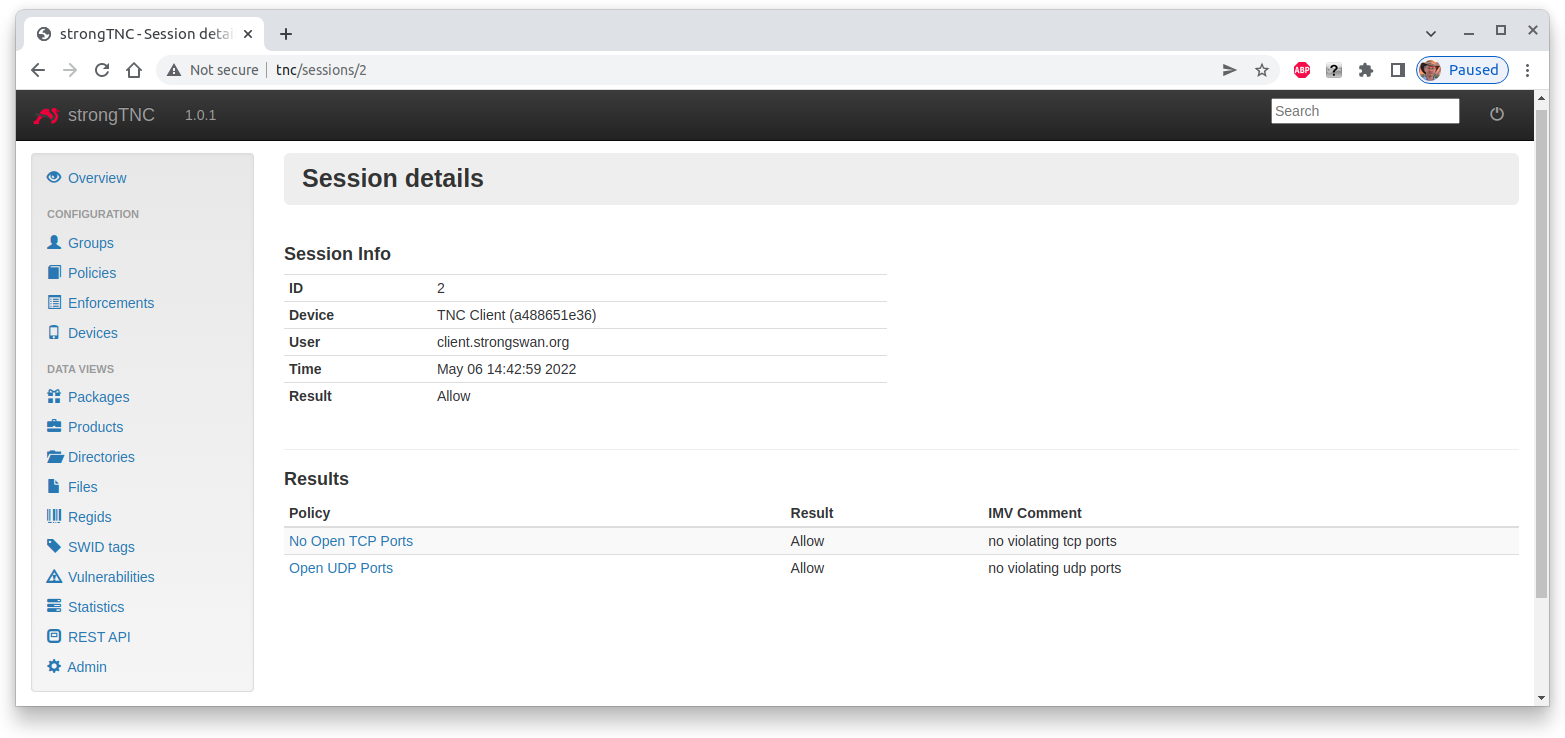
and the most recent Session details show that there are no TNC policy violations
Docker Image
The TNC measurement scenarios described above can be
practically tested with a
tnc-server and a
tnc-client Docker container
connected via a
virtual test network available
for download from https://github.com/strongX509/docker.